|
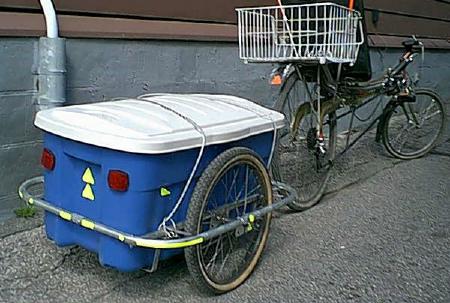
July 2007 Update: I've been getting emails and pics from folks that have seen this page and built their own trailers. These have been posted to my blog here and here. October 2005 Update: I have just completed building a larger trailer using the same techniques described below. But this time I took photos as I went along, so you can see those at my Big Trailer page. August 2003 Update: Over the past few years since I first put this page up I've received many emails asking for more specific info on how to build this thing. So I have added as much detail as I can along with a few primitive diagrams. I'd always wanted some sort of utility trailer for my bike, but it took getting rid of my car to really get the project in gear. The idea was to find a Rubbermaid container big enough in which to fit all of my Hand drums, and build the trailer around that. (What great fun I had in the store, pulling all the large containers to the floor and measuring them!) I got the design idea from a neat book called "The Cart Book, with Plans and Projects" by William L. Sullivan (which I believe is out of print, but I discovered it at the local library). The design calls for using electrical conduit (EMT) pipe for the frame, and electrical box covers (with slots cut into them) are used as axle plates (by bending them around the tube). EMT pipe is not expensive (five bucks for a ten foot length), but I wanted to recycle where possible, so I got mine for two bucks per from a local scrap metal place. OK, so here's the more or less complete scoop on how to build one. You need two ten foot pieces of 3/4 inch conduit - one for the left or hitch side, the other for the right (see diagram below). They meet in the middle at the rear of trailer, and are joined by a regular EMT coupling. (I reinforced this joint by slipping in a foot long piece of dowel, that centers on the coupling and extends into each pipe.) You can get this coupling at the same place you get the pipe. If the scrap dealer doesn't have any, then head to your local electrical shop, and while you're there you must get the one tool you can't do without for this project--a conduit bender. It's worth it, as you can use it to build more trailers or what have you (or do your own electrical work!). I think that most equipment rental stores will carry this if you just need it for a day. Once you have cut and bent the pipes to form the main frame, use your two leftover pieces to make the inner part of the wheel-wells. These should just be flattened at each end, and then slightly curved to fit the main frame pipes they are to attach to. Drill holes and run the bolts through. The distance of these inner tubes from the outer ones wil be determined by how wide you axles are. And you can use any size wheel - mine uses 20" to keep the height down. It is not recommended that you weld your EMT frame, as this stuff has a zinc coating, and gives off highly noxious/toxic fumes when heated. If you are to do this, then at least do so outdoors with proper protection! The only downside I've found to bolting it together is that the bolts can crush the tubing if you over-torque them. For instance, where the ride side pipe curves to lie beside the hitch arm, the end of the pipe is open, so I would recommend slipping a piece of dowel in there before drilling the holes to that when inserted and tightened the bolts don't crush this section. Obviously one should check the bolts every now and then and make sure that they stay tight! I used Loctite, and one could also use nylock nuts (the ones with a plastic insert) as well. 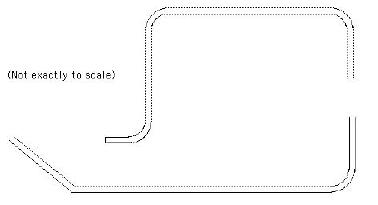
What the two main pipes should look like after bending The axle plates are made out of 4" square electrical utility box covers. Here's how do this part: using a hacksaw, cut a 1/2" slot down the middle of each one, stopping about halfway. This will be the axle slot. Mount a scrap piece of pipe and a slotted cover into a vise. Make sure that the cover is at the same height of the tube (that is, if they were on the floor, the cover would be against the tube, with the slot sticking up). Using your hand, pull (or push) the cover so it starts to wrap around the pipe. Make sure the vise is quite tight, as a slip here will be rather counterproductive! You want to keep bending the cover so that it eventually wraps around the tube in a U-shape. The reason for this is that you will be drilling bolt holes to go through the cover, through both walls of the pipe, and then the other half of the U. 
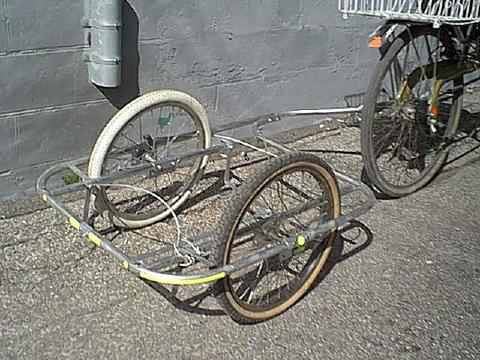
What the axle plates should look like. Once you have this done for all four covers (two per wheel), you need to line them up in their respective positions for attachment. Use 'C' clamps to hold things together. I placed mine to be right in the middle of the frame. You need to make sure that they are all lined up side by side, so once you've done the first one, clamp all the others in, and line the slots up with a straight edge of some kind, like a good wooden or metal yardstick, or very straight piece of wood. While doing all of this, make sure that you remember which way is UP on your trailer! You want the wheel slots to point downwards! (well duh...) When you mount the wheels, tilt them in a bit at the top, like they do for kid's trailers. This helps to keep the trailer from bouncing too much when travelling unloaded. This was all clamped and bolted together. I then added some pieces of metal strapping across the bottom to support the container, as I designed it so that said container could just be lifted out (or also just bolted in). This also meant that when it was removed, the trailer was flat, and with the addition of a piece of plywood, a platform was available to haul objects that were longer than the container. The wheels/tires were pulled off two junked kid's bikes, with the white-tired one still sporting its rooster-shaped reflector. Steel wheels like this will do just fine, and are dirt cheap, but they are heavier. One could always splurge on some decent alloy BMX wheels for lightness and added strength, since they will have a higher spoke count and a better quality hub. 
The two main pipes fitted together. 
The main frame, with inner pipes added to create wheel housings. The hitch is definitely a thing to figure out. I wanted to get a conventional hitch from a Burley or other commercial design, but found out that they don't supply them! In fact, they don't want to sell to homebuilders at all due to liability problems, and more than one bike store told me that they could only get a hitch for warranty work if they sent the old one back in! But as of this update I have acquired a conventional hitch of this kind, but only because a customer at the store sold me his old one. Until I got this hitch, I actually had a pretty good solution worked out, so for those who who can't acquire one, here's how I came up with my old idea. The big challenge for me was that my Linear recumbent's chainstays are rather unorthodox, being flat plates instead of round tubes! But the flat plate allowed me to drill a 1/4" hole and insert a 3" long eye-bolt so that is was sticking out horizontally. I then flattened the end of the trailer arm, and drilled a hole and put another 3 inch eye-bolt through it (vertically), snugging the 'eye' part right down against the frame, so that most of the threaded part was sticking out below. To fit this all together, the trailer arm's threaded bolt (the bottom of the eye-bolt) drops into the chainstay's eye-bolt, providing a loose fit. I then just wrapped a bungee cord around this whole assembly (which is why I used an eye-bolt for the trailer arm. I could have just used a flat-topped bolt, but the 'eye' part sticking up gives the bungee something to wrap around). This loose fit allows the up-and-down and side-to-side flexibility the trailer needs, and the bungee just keeps it all together. To use this system on my regular bikes (and this is what I'm sure most of you reading this will want to know), I needed to come up with something that would attach to each bike's chainstay that the trailer's eye-bolt could drop into. The simplest thing was to use a flat 'L' bracket (the kind used to support lightweight shelves). These brackets have two holes on each 'arm' and each arm is about three inches long. I simply clamped one in a vise and bent it around until it formed a "D', and also lined up two of the holes through which I could insert a short bolt and nut to hold the circle together. Then, lining up the flat part of the 'D' against the chainstay (just ahead of the dropout) I clamped it to the frame with two hoseclamps. Then the trailer arm's bolt can just drop into the opening and a bungee can be wrapped around the connection as described earlier. Now that I have the conventional hitch, I have to take these things off my other bikes, and come up with a way to attach this hitch to the Linear! Actually, I have an idea already, which would consist keeping the eye-bolt on the Linear, and then clamping a short piece of pipe into the hitch, with an eye-bolt sticking out of the pipe. This could then be fitted together with the bungee, etc. etc.
Trailer without the container.
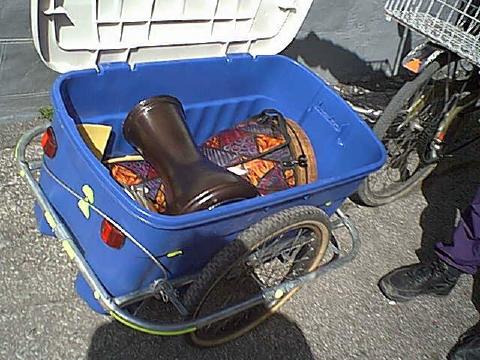
Trailer with open container showing how well my hand drums fit inside.
Bringing a nice old 3-speed home from a local thrift store for a friend. |