The Idea
I got the idea for a tailbox from some creative folks on the various Internet recumbent email lists. The tailbox serves many functions - it keeps things dry; my repair kit, pump, and hydration bag can stay with the bike (not carried around in my knapsack!) when parked; and it has a small aerodynamic benefit, or so I'm told. (When my cycle computer died, I didn't bother replacing it, so I can't make any comparison speed tests. I just know that after spending all that time designing and building the darn thing, I can feel the speed difference! [grin]).
The Design
The box is made from Coroplast(TM), which is corrugated plastic, the material used for election signs and store displays. It's easy to cut with a knife, and can be bent at different angles by heating it with a paint stripping gun or stove element. Some folks have built theirs using rivets or nuts and washers, but I decided to use zip-ties (also known as cable ties) and double-sided tape. The yellow edging trim is Topflight Econokote(TM), a plastic covering that is used on model and remote-control airplanes. (Special thanks to Bill Volk for this tip.)
The tricky part was getting the angles right, as I wanted the front of the box to fit snug against the Linear's seatstays. Those stays don't hang straight down; they start at the outside top edge of the seat, and then angle in towards the chainstays. AND they come back towards the seat a bit. So, that front panel had to be designed first. Then, the one piece that was going to wrap around and form the two sides and back had to be fitted. Only then could I start working out the details for the bottom portion that fit over the rack. That also gave me one of those "DUH!" moments. I was taping everything together to see how it fit, and couldn't understand why one of my measurements was off.
Well, it only took an hour's worth of head-scratching to realize that the very rear part of my bike rack tilted up a bit. DUH!! The rack for my old hybrid was flat, and I had the basket on my Linear for so long that I didn't even pay attention to this lip. Well, once I took that little kick-up at the end into account, the measuring went much more smoothly! (Yeah, some of you are laughing, but hey, I'm a drummer, and am happy just to be able to count to four... [grin])
In the photos you will notice that the sides actually extend past the seat stays. I wanted to enclose the area between the seat and the box, partly for aerodynamic reasons, and just because it would look better! (This also allows the pressurized bottle for the Air Zound horn to be hidden from harm's way.) When the sides were connected to the rest of the box, I simply had them extending past the seat. I then cut them back, and curved the edges to tuck in behind the seat. There is a bit of space where the seat stay pokes out from the side panel, and on the right side that's where the tube for the hydration bag comes out. The tube then hangs beside the seat, and a little bit of velcro keeps it tucked along side the seat.
The bottom of the box is held to the rack with velcro, and the front is attached to each seat stay with velcro and two zipties for extra strength. I kept the plastic fender flap that had been keeping spray off the basket, and it sticks out just past the bottom of the box for the same purpose. (In case you're wondering why I didn't just make the end of the box go past the wheel, it's because the bike has to stand on end when not in the house, so a little bit of wheel had to remain sticking out.) The lid is hinged with zipties, and fastens down with velcro mounted to two small L-brackets.
The rear light is mounted flush with the back panel, and I cut a small hole so I can access the on/off switch from inside. It hasn't leaked yet, but I can seal around the fixture if water does get in. A hook has also been duct-taped along the inside rear panel to hold the u-lock. So far, this tailbox has worked out quite nicely. Of course, now people stare at the bike even more than before, and we won't even talk about the gawking that happens when I add the trailer to all of this! With this set-up one can sometimes feel like a one-man parade, but there is the joy of making everyone else's day just a bit more surreal. [smile]
for the larger pictures.
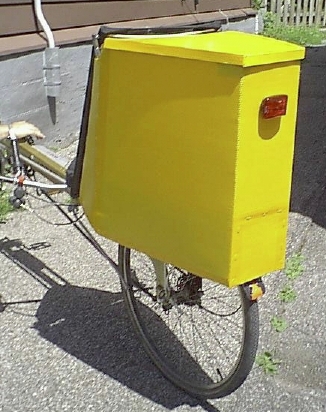
Rear/side view.
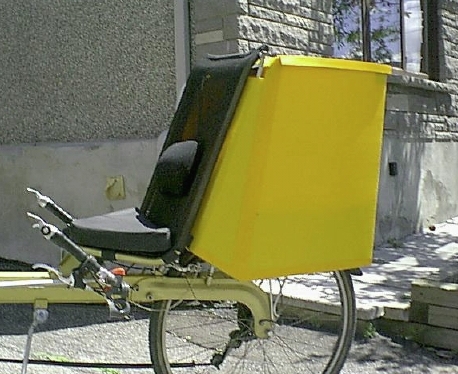
Side view.

Inside of box, showing hydration
bag mounting, and false floor.
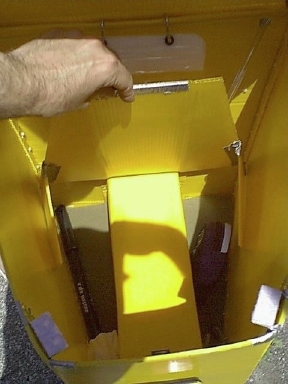
Inside of box, with false floor lifted,
showing space for pump, tools, etc.
(Photos by Nancy Shaver)